
Aug 30, 2019
Deploying Signals for On-Premises: PowerMTA Integration
Vamos a sumergirnos en los detalles de la configuración de PowerMTA para Señales SparkPost. Vas a necesitar:
Un host en el que ejecutar la última versión de PowerMTA , ya sea una máquina nueva o una ya existente.
A SparkPost account with API key permission for “Incoming Events: Write” como se describe aquí
Configuraremos PowerMTA para transmitir los eventos a tu cuenta SparkPost, entonces podrás utilizar lo siguiente:
Firstly, install (or upgrade) to PowerMTA 5.0 r4 or later, following the instrucciones habituales de instalación de v5.0 which are pretty straightforward. Then we’ll work through the following steps:
Configure el conector PowerMTA to SparkPost Signals
Configurar Engagement Tracking con un dominio de seguimiento personalizado
Seleccione qué flujos de tráfico de PowerMTA deben notificarse a Señales
Comprobación de que sus eventos llegan a las Señales
Repase cómo utilizar nombres significativos que aparezcan bien en los informes.
También cubriremos otros aspectos específicos de la configuración de PowerPMTA utilizados en nuestra demostración de Señales:
Eventos FBL (reclamaciones de spam) y rebotes remotos (fuera de banda)
Configuración de la inyección, incluido DKIM
Configuración FBL y OOB
Configuración y denominación de VirtualMTA (y cómo aparece en los informes de SparkPost Signals)
Finally, there’s a “bonus feature” with code to ensure your campaign names are compatible with PowerMTA X-Job name conventions.
Configure PowerMTA connector
En Signals configuration is described in the 5.0 Guía del usuario sección 10.1. Here we’ll start with “Use Case #2”, which enables Signals for all traffic from this PowerMTA host, and enable SparkPost engagement tracking.
# # SparkPost Signals # <signals> api-key ##my ingest API key here## upload-url https://api.sparkpost.com/api/v1/ingest/events log-verbose true espacio libre mínimo 1G engagement-tracking sparkpost # this turns on the open and click tracking in PowerMTA customer-id 123 # Your SparkPost account number here </signals> habilitar-señales true
He aquí lo que hace cada atributo:
api-key
Esto es único para tu cuenta SparkPost, es el valor que obtuviste de SparkPost anteriormente.
upload-url
Debe coincidir con la dirección de su servicio API SparkPost, ya sea de EE.UU. o de la UE. Para más información consulte aquí. Los valores habituales son:
SparkPost (US): https://api.sparkpost.com/api/v1/ingest/events
SparkPost EU: https://api.eu.sparkpost.com/api/v1/ingest/events
log-verbose
Esta directiva es opcional y cuando se activa, da un poco más de información en el archivo pmta.log, que puede ser útil durante la configuración para confirmar que todo está funcionando correctamente. Cada minuto, incluso cuando no hay tráfico, verás:
2019-07-26 11:47:57 Señales: Descubiertos 0 archivos
Con tráfico, verás algo como:
2019-07-26 11:50:57 Señales: Descubierto sp1-0000000000003FBD.json 2019-07-26 11:50:57 Señales: Transferido sp1-0000000000003FBD.json con éxito. 2019-07-26 11:50:57 Señales: Descubierto 1 archivo, transferido 1 archivo con éxito
espacio libre mínimo
Indica a PowerMTA el umbral de espacio en disco a partir del cual debe empezar a borrar los archivos de eventos JSON de SparkPost más antiguos para dejar espacio a nuevos archivos cuando el espacio en disco se esté agotando.
habilitar-señales
This tells PowerMTA to upload to Signals, in this case globally for all traffic (more info aquí, para v5.0). You can be more selective about what traffic streams to upload if you wish.
You can also mark particular PowerMTA traffic to be reported as belonging to a SparkPost subaccount – this is another way to distinguish one particular traffic stream from another.
seguimiento del compromiso, identificación del cliente
PowerMTA’s Engagement Tracking solution defaults a la tracking domain for the SparkPost US-hosted service. You specify your SparkPost numeric customer ID; here’s instrucciones para encontrarlo.
dominio de seguimiento
Para las cuentas SparkPost EU, añada la siguiente línea:
tracking-domain pmta.eu.spgo.io # este es el endpoint para SparkPost EU
Dominio de seguimiento personalizado
Si prefiere utilizar su propio dominio de seguimiento (es mejor desde el punto de vista de la entregabilidad), haga lo siguiente:
Create tracking domain with your DNS provider by creating a CNAME record. This will usually be a subdomain of your top-level domain, e.g. track.mycompany.com .
track.mycompany.com CNAME pmta.spgo.io # si tiene una cuenta SparkPost US track.mycompany.com CNAME pmta.eu.spgo.io # si tiene una cuenta SparkPost EU
You can also use HTTPS tracking domains, although this is more involved (see SparkPost configuration steps here).
Register tracking domain in your SparkPost account, and verifíquelo. Wait a few minutes before trying this, to allow your DNS changes to propagate through the Internet, depending on your DNS provider.
Configure PowerMTA para utilizar ese dominio en lugar del predeterminado, con
tracking-domain tudominio.com # Ponga aquí su propio dominio
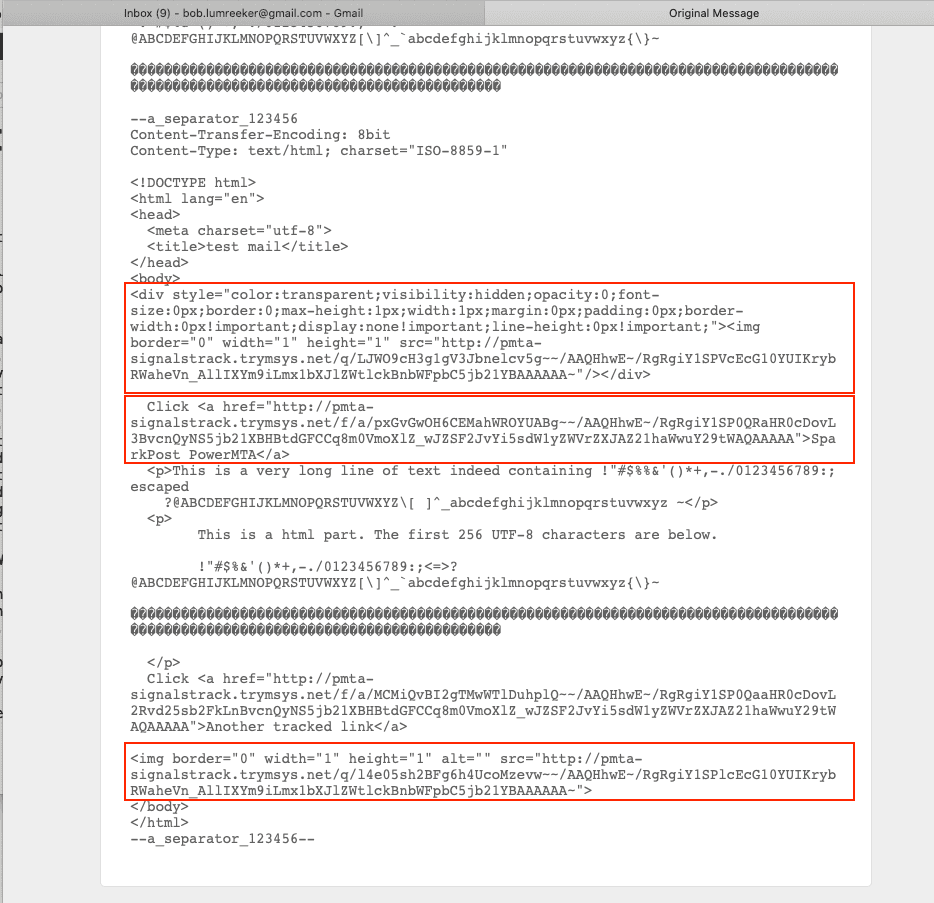
Puedes comprobar que los correos electrónicos entregados tienen "píxeles de apertura" añadidos y los enlaces envueltos, mirando las partes internas del correo (en Gmail, utiliza el menú superior derecho y elige "Mostrar original").

You’ll notice the open pixels en el beginning and end of the HTML in the email. Each HTML link is also changed to have REF pointing a la tracking domain.
Esto es todo lo que necesita para que SparkPost Signals funcione con el seguimiento de la participación integrado en PowerMTA.
Evitar que se rastreen enlaces específicos en su correo electrónico html
You can prevent PowerMTA from tracking specific links, by setting the custom attribute data-msys-clicktrack to “0” :
<a href="#" data-msys-clicktrack="0">Example</a>
PowerMTA no envolverá el enlace. También eliminará ese atributo antes de transmitir el mensaje a su destinatario.
Seleccione qué flujos de tráfico de PowerMTA deben notificarse a Señales
Puede seleccionar Señales para que estén activas:
Globalmente (es lo que hemos utilizado en el ejemplo anterior)
Para algunos MTA virtuales y no para otros
Para algunos grupos de MTA virtuales y no para otros
Para direcciones "Remitente" o "De" específicas retransmitidas por PowerMTA, en combinación con las selecciones Virtual MTA / Virtual MTA pool.
This configuration is very powerful and is illustrated through a series of ejemplos de uso (v5.0) in the User Guide.
Comprobación de que sus eventos llegan a las Señales
Esta es una vista de SparkPost Signals, conectado a PowerMTA. Puede ver que la puntuación de salud está variando.
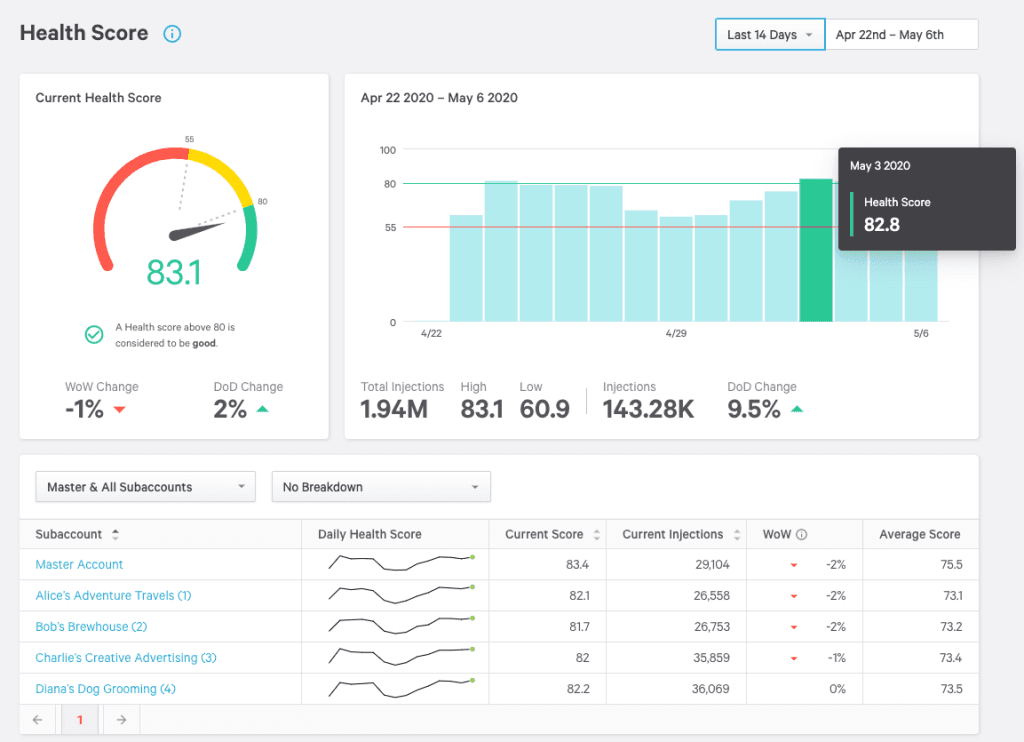
Los nombres de campaña están disponibles como facetas de informes, junto con Subcuenta, Grupo IP, Proveedor de buzón y Dominio de envío.
Además de consultar los registros de PowerMTA , puede comprobar que los datos de los eventos llegan a SparkPost consultando la pantalla Integración de señales.
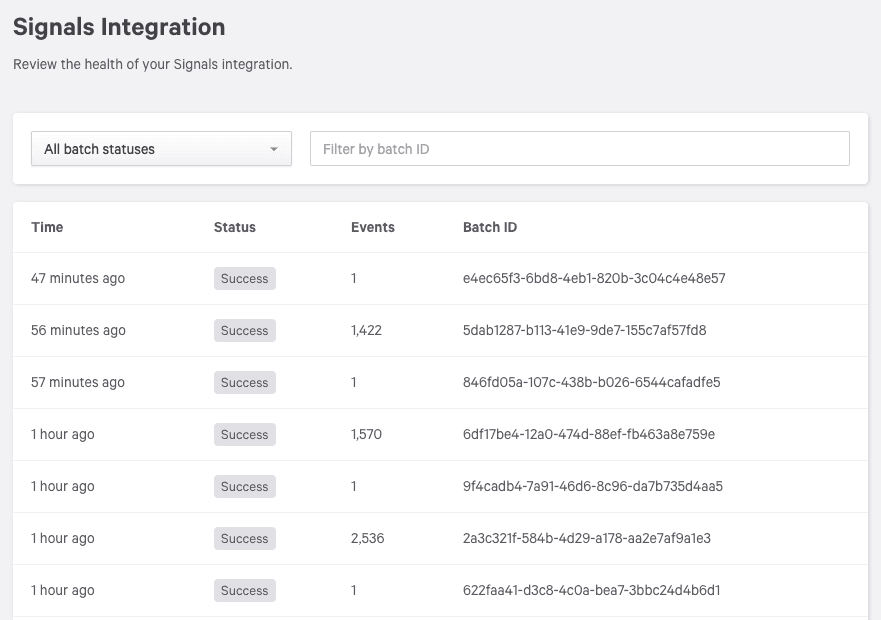
In your SparkPost Búsqueda de eventos screen, you should see events appear within a few minutes. These will include Injection and Delivery events, as well as Bounce, and potentially Out-of-Band Bounce and Spam Complaint events, if you’ve already configured PowerMTA to handle those for you.
If you have Engagement Tracking enabled, you will also see open , initial_open , and click events.
Utilizar nombres significativos que aparezcan bien en los informes
Setting up the PowerMTA VirtualMTA Pool names and Job names to be meaningful and human-readable is well worth doing. These show up directly in your SparkPost Signals facets and the Informe resumido.
Como se mencionó anteriormente, no es necesario crear estos grupos en su cuenta SparkPost. SparkPost los recoge de su configuración PowerMTA .
Así es como los términos de configuración de PowerMTA se traducen a términos de SparkPost.
PowerMTA términoSparkPost Informes / Señales términoRecipient Domain
(domain portion of “rcpt” field in Accounting file).Recipient DomainEn domain portion of the “Sender” or “From” header in the message relayed by PowerMTA.
(domain portion of “orig” in Accounting file).Sending DomainVirtualMTA (name)—VirtualMTA Pool (name)
(“vmtaPool” in accounting file)IP Pool (name)smtp-source-host a.b.c.d
(“dlvSourceIp” in accounting file)Sending IP a.b.c.dJob (name)
(“jobId” in accounting file)Campaign ID (name)—Template (name)“Subaccount” is not a native PowerMTA concept.
Sin embargo, PowerMTA puede etiquetar virtualMTAs, MTA Pools virtuales o dominios Sender-or-From con un ID de subcuenta a efectos de informes de SparkPost.
ID de subcuenta (número)FBL (evento)Reclamación de spam (evento)Rebote remoto (evento)Rebote fuera de banda (evento)
Setting up at least one smtp-source-host address also enables SparkPost to correctly identify the sending IP address so that it shows up on Injection and Delivery events, as well as in the Informe resumido view.
Job names are set in PowerMTA via a header in the injected message. As well as enabling individual job control (pause/resume etc) which is useful in itself, PowerMTA passes the names through to SparkPost Signals reporting as “campaign ID”. See User Guide v5.0 sección 12.8 "Seguimiento de una campaña en PowerMTA con un JobID".
There are a few things to be aware of regarding job naming. While SparkPost (with JSON format, and JSON escaping) allows characters such as <SPACE> in campaign names, mail headers are more restrictive. Valid characters allowed in the X-Job header are:
A-Za-z0-9!#$%&'()*+,-./:;<=>?@[\]^_{|}~
In other words, disallowed characters include <SPACE>, double-quotes “ and backtick `. If you’re used to working with X-Job names, this won’t be surprising, and your campaign ID names will “just work” on SparkPost reporting. If like me, you learned SparkPost first, you might want a tool to ensure your X-Job values are safe; see the bonus feature en el end of este artículo.
Eventos FBL (reclamaciones de spam) y rebotes remotos (fuera de banda)
PowerMTA puede recibir y procesar eventos FBL (conocidos en SparkPost como eventos de Denuncia de Spam) y rebotes remotos (conocidos en SparkPost como rebotes fuera de banda, porque la respuesta llega un tiempo después, en lugar de durante la conversación SMTP).
There are articles in the Port25 Soporte Forum on how to set up the Procesador de rebotes and the Procesador FBL. If you are an existing PowerMTA user, you probably already have these.
Esta es la configuración que hice para una demo, basada en estos artículos y orientada a alojar PowerMTA en Amazon EC2.
Si está familiarizado con la configuración de PowerMTA en esta área, puede saltarse esta parte, hasta la siguiente línea horizontal.
Configuración de inyección
Utilizaremos el puerto 587 para los mensajes inyectados, que llegarán a través de la Internet pública desde otro host. Tenemos que evitar que malos actores descubran y abusen de este servicio, por lo que aplicamos autenticación de nombre de usuario/contraseña y TLS opcional, similar a los puntos finales de inyección SMTP de SparkPost.
Queremos poder enviar mensajes desde fuentes que estén correctamente autenticadas a cualquier destino. También queremos un listener separado en el puerto 25 para FBL y respuestas de rebote remotas que no requieran autenticación.
# Dirección(es) IP y puerto(s) en los que escuchar las conexiones SMTP entrantes # smtp-listener 0.0.0.0:587 smtp-listener 0.0.0.0:25
In the following <source> declarations, we’re using username/password authentication and optional TLS to defend against rogue message injection. We also set rate limits on connections making failed password attempts.
Tu configuración puede ser diferente; por ejemplo, si tienes una red privada entre el inyector y PowerMTA, no necesitarás autenticación por contraseña.
# One source rule for all injection, internal or external. Enforce auth, except for bounces and FBLs # <source 0/0> log-connections false log-commands false # WARNING: verbose! just for dev log-data false # WARNING: even more verbose! smtp-service true # allow SMTP service smtp-max-auth-failure-rate 1/min allow-unencrypted-plain-auth false allow-starttls true rewrite-list mfrom </source> <source {auth}> always-allow-relaying yes # only if the auth succeeds default-virtual-mta default process-x-job true </source>
The <source {auth}> declaration (ver aquí. v5.0) applies once authentication has passed. Here, it allows onward relaying, sets up the default virtual MTA group to use, and adds the X-Job header (which will be reported by SparkPost Signals as campaign_id).
La lista de reescritura asigna los mensajes inyectados para que utilicen un dominio MAIL FROM específico (también conocido como dominio de rebote o Return-Path:).
# # Rewrite the MAIL FROM address to match the bounce domain # <rewrite-list mfrom> mail-from *@pmta.signalsdemo.trymsys.net *@bounces.pmta.signalsdemo.trymsys.net </rewrite-list>
Then we set up our Configuración TLS and SMTP username / password, according to recomendaciones actuales.
# # Secure the inbound service with username, password and TLS. SMT 2020-06-15 # smtp-server-tls-certificate /etc/pmta/pmtasignalsdemo.pem smtp-server-tls-allow-tlsv1 false smtp-server-tls-allow-tlsv1.1 false smtp-server-tls-allow-tlsv1.2 true smtp-server-tls-allow-tlsv1.3 true # # SMTP users (authenticated via SMTP AUTH) # <smtp-user SMTP_Injection> password ##PUT YOUR PASSWORD HERE## authentication-method password </smtp-user>
We can check that the (insecure, obsoleto) TLS v1.0 is not accepted using my favorite SMTP test tool, swaks.
swaks --servidor pmta.signalsdemo.trymsys.net --port 587 --to test@trymsys.net --from any@sparkpost.com --tls --tls-protocolo tlsv1
Ya vemos:
*** TLS startup failed (connect(): error:00000000:lib(0):func(0):reason(0)) *** STARTTLS attempted but failed
Likewise for -tls-protocolo tlsv1_1.
Let’s also apply DKIM signing on our outgoing messages, as it’s good practice (I followed estas instrucciones to set up the key).
# DKIM # domain-key mypmta, pmta.signalsdemo.trymsys.net, /etc/pmta/mypmta.pmta.signalsdemo.trymsys.net.pem
Configuración FBL y OOB
Now .. finally .. we declare which specific domains are open for remote bounce and FBL responses. We don’t want to relay those anywhere (to prevent ataques de retrodispersión), just internally process those responses.
# # Enable Bounce and FBL processing on specific domains # relay-domain pmta.signalsdemo.trymsys.net relay-domain bounces.pmta.signalsdemo.trymsys.net relay-domain fbl.pmta.signalsdemo.trymsys.net <bounce-processor> deliver-unmatched-email no deliver-matched-email no <address-list> domain pmta.signalsdemo.trymsys.net domain bounces.pmta.signalsdemo.trymsys.net </address-list> </bounce-processor> <feedback-loop-processor> deliver-unmatched-email no deliver-matched-email no <address-list> domain fbl.pmta.signalsdemo.trymsys.net </address-list> </feedback-loop-processor>
You can see I set up two bounce domains, as I was playing around with using/not using the mfrom rewrite rule.
The FBL domain is usually then registered with external services such as Microsoft SNDS; see this article for more information. For this demo, the FBLs will be coming from the Fregadero hinchable, so no need to register.
Prueba del receptor SMTP
Es importante comprobar que su listener SMTP requiere autorización para cualquier destino general, rechazando cualquier mensaje que no esté específicamente dirigido a los dominios FBL y remote-bounce.
swaks --servidor pmta.signalsdemo.trymsys.net --port 25 --to test@strange.pmta.signalsdemo.trymsys.net --from any@sparkpost.com
La respuesta, como era de esperar, muestra que la retransmisión está denegada:
550 5.7.1 relaying denied for recipient in "RCPT TO:<test@strange.pmta.signalsdemo.trymsys.net>
(Fin de la descripción de la configuración de la demostración).
Configuración y denominación de VirtualMTA
PowerMTA VirtualMTAs (y VirtualMTA pools) son potentes características para la gestión de flujos de mensajes, y PowerMTA / SparkPost Signals reporting features work best with these active.
# # Route all outgoing traffic through this virtual mta / pool. # Declare the delivery IP address here, so that SparkPost signals ingest injection (aka "reception") events # will carry the correct sending_IP attribute # <virtual-mta mta1> smtp-source-host 172.31.25.101 pmta.signalsdemo.trymsys.net </virtual-mta> <virtual-mta-pool default> virtual-mta mta1 <domain *> max-smtp-out 20 # max. connections *per domain* bounce-after 4d12h # 4 days, 12 hours retry-after 10m # 10 minutes dkim-sign yes </domain> </virtual-mta-pool>
The virtual-mta-pool setting is reported in SparkPost as “IP Pool”, and is available as a SparkPost Signals reporting facet (the drop-down menu underneath the charts).
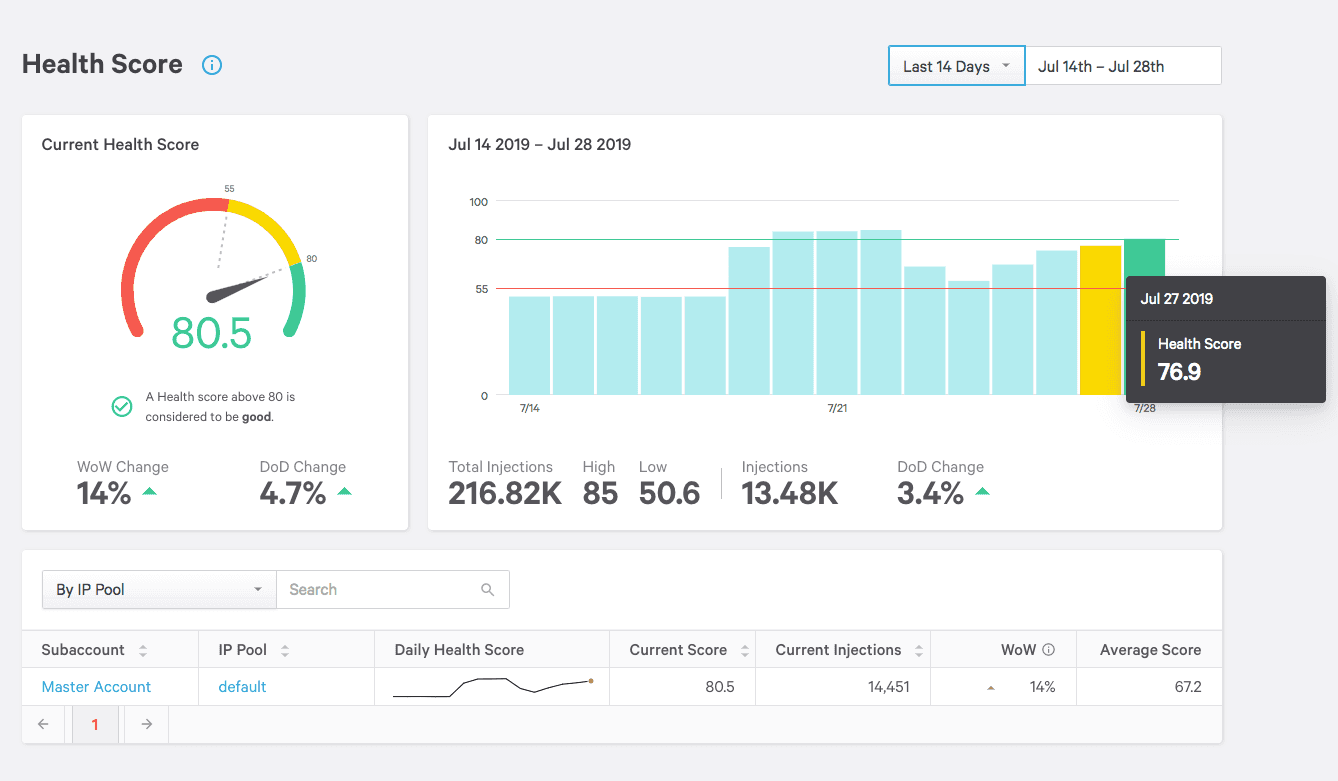
El informe resumido también muestra el grupo de IP como una faceta del informe "Agrupar por".
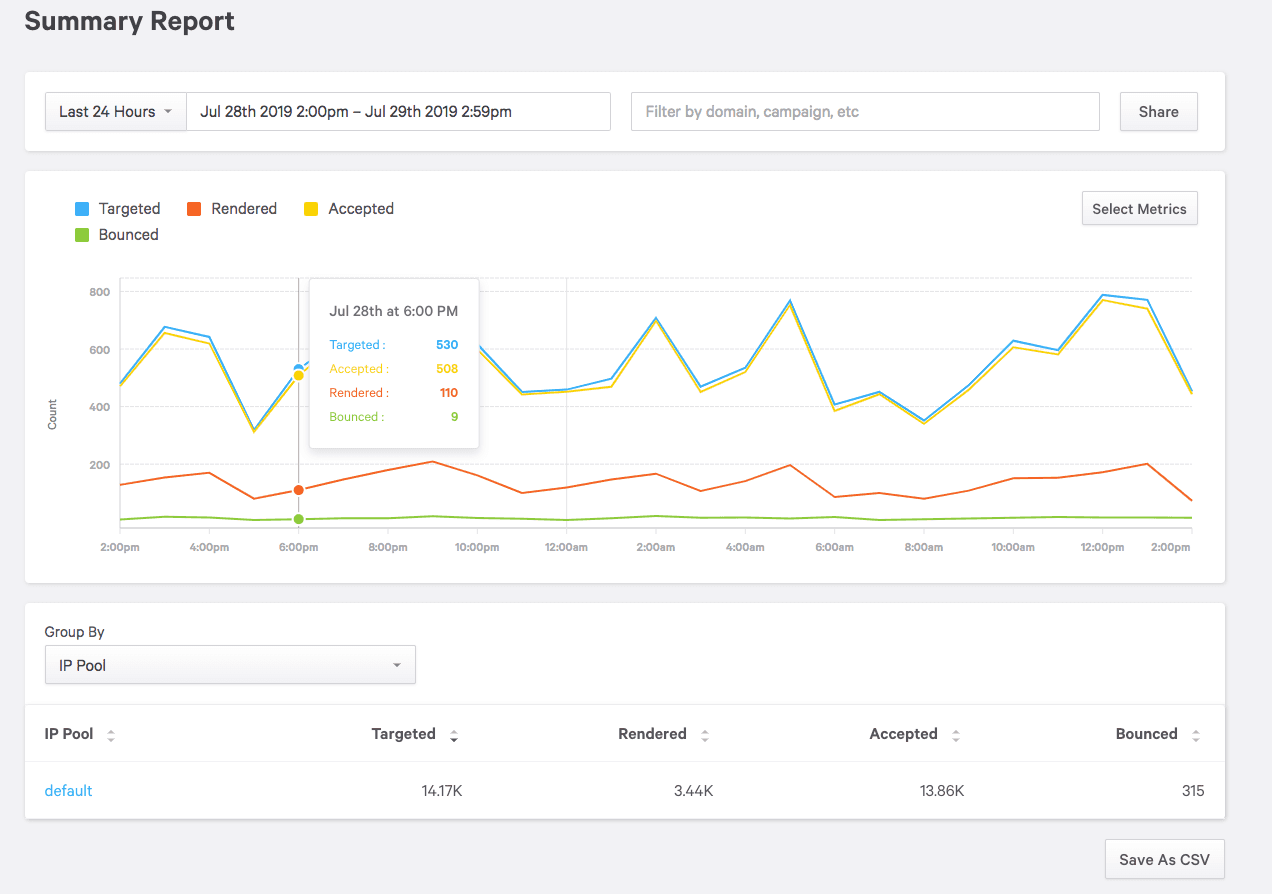
As noted earlier in this article, setting up at least one smtp-source-host address also enables SparkPost to correctly identify the sending IP address, so that it shows up on Injection and Delivery events, and on the Summary Report:

That’s all you need to get a basic integration working between PowerMTA and SparkPost Signals. You’ll find the ejemplo de archivo de configuración completo.
Antes de que te vayas, aquí está la función de bonificación que he mencionado.
Función adicional: Comprobación/filtrado de nombres de X-Job
To ensure any character string is safe for use as a PowerMTA X-Job name, here’s a simple Python function to map any unsafe characters to an underscore “_”
import re def pmtaSafeJobID(s): """ :param s: str :return: str Map an arbitrary campaign ID string into allowed chars for PMTA X-Job header. See https://download.port25.com/files/UsersGuide-5.0.html#tracking-a-campaign-in-powermta-with-a-jobid Specifically disallow <sp> " ` but allow through most other chars. """ # Note have to escape ' - [ ] and double-escape \ - see https://docs.python.org/3/library/re.html disallowedChars = '[^A-Za-z0-9!#$%&\'()*+,\-./:;<=>?@\[\\\\\]^_{|}~]' return re.sub(disallowedChars, '_', s)
This uses Expresiones regulares en Python in a specific way. It declares the set of disallowed characters using the “set complement” operator ^ rather than list all allowed chars. That means we catch (and make safe) characters beyond the usual 7-bit set. We can show that using this test fragment:
s='' for i in range(32, 256): s += chr(i) print(pmtaSafeJobID(s))
Dar
_!_#$%&'()*+,-./0123456789:;<=>?@ABCDEFGHIJKLMNOPQRSTUVWXYZ[\]^__abcdefghijkl mnopqrstuvwxyz{|}~___________________________________________________________ ______________________________________________________________________
You can see that <SPACE>, double-quotes “, and backtick `, as well as all characters beyond ~ are mapped to underscore.