
Dec 2, 2021
How to create leads or cases in Salesforce with Flow Builder
Bird ofrece muchas integraciones directas que le permiten conectar sus comunicaciones a las herramientas y plataformas que ya utiliza en su empresa.
Using Flow Builder's native integrations, custom connections via HTTP requests and webhooks, you can easily enrich customer profiles, enable rapid sales engagement and drive more qualified leads.
Today, we will discuss our integration with Salesforce.
Con esta integración puedes:
Añada clientes potenciales a Salesforce desde diferentes medios de comunicación channels: WhatsApp, Instagram, Telegram, WeChat, LINE, Messenger, Google Business Chat, Viber, etc.
Cree casos en Salesforce para mantener registros y almacene datos clave dentro de los casos de todas sus channels
Aplique la flexibilidad y la automatización de la creación de clientes potenciales/casos en cualquier punto de su embudo de ventas
En esta guía aprenderás a:
Configure Salesforce correctamente
Conecte Salesforce con Bird
Solución de errores al conectar Salesforce
Cree un flujo en Flow Builder que introduzca datos en Salesforce
Conecte WhatsApp con Salesforce para enviar sus clientes potenciales
Conecte Viber con Salesforce para enviar sus casos
Requisitos para la integración de Salesforce
Antes de empezar a construir la lógica en Flow Builder, necesitas tener listos los siguientes requisitos:
Una cuenta Bird: Make sure you have access as administrador.
Una cuenta de Salesforce: Necesita "Acceso de administrador".
Paso 1: Vaya a Aplicaciones conectadas en Salesforce para integrarse con Bird
To access the Aplicaciones conectadas section in Salesforce (Lighting Experience), follow these steps:
Login to Salesforce as an administrator
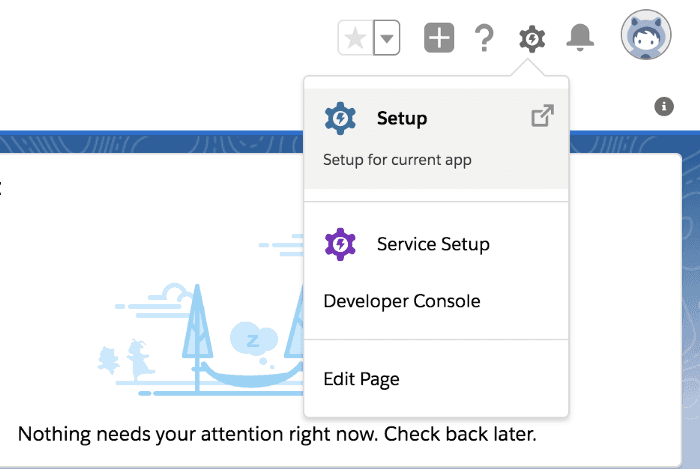
Select Configurar in the drop-down list of the account (in the upper-right corner)
On the left-hand pane, go to Gestor de aplicaciones > Nueva aplicación conectada
Nota: si se encuentra con el problema de visualización que aparece a continuación, haga clic en "Haga clic aquí para abrir esta página en Salesforce Classic".

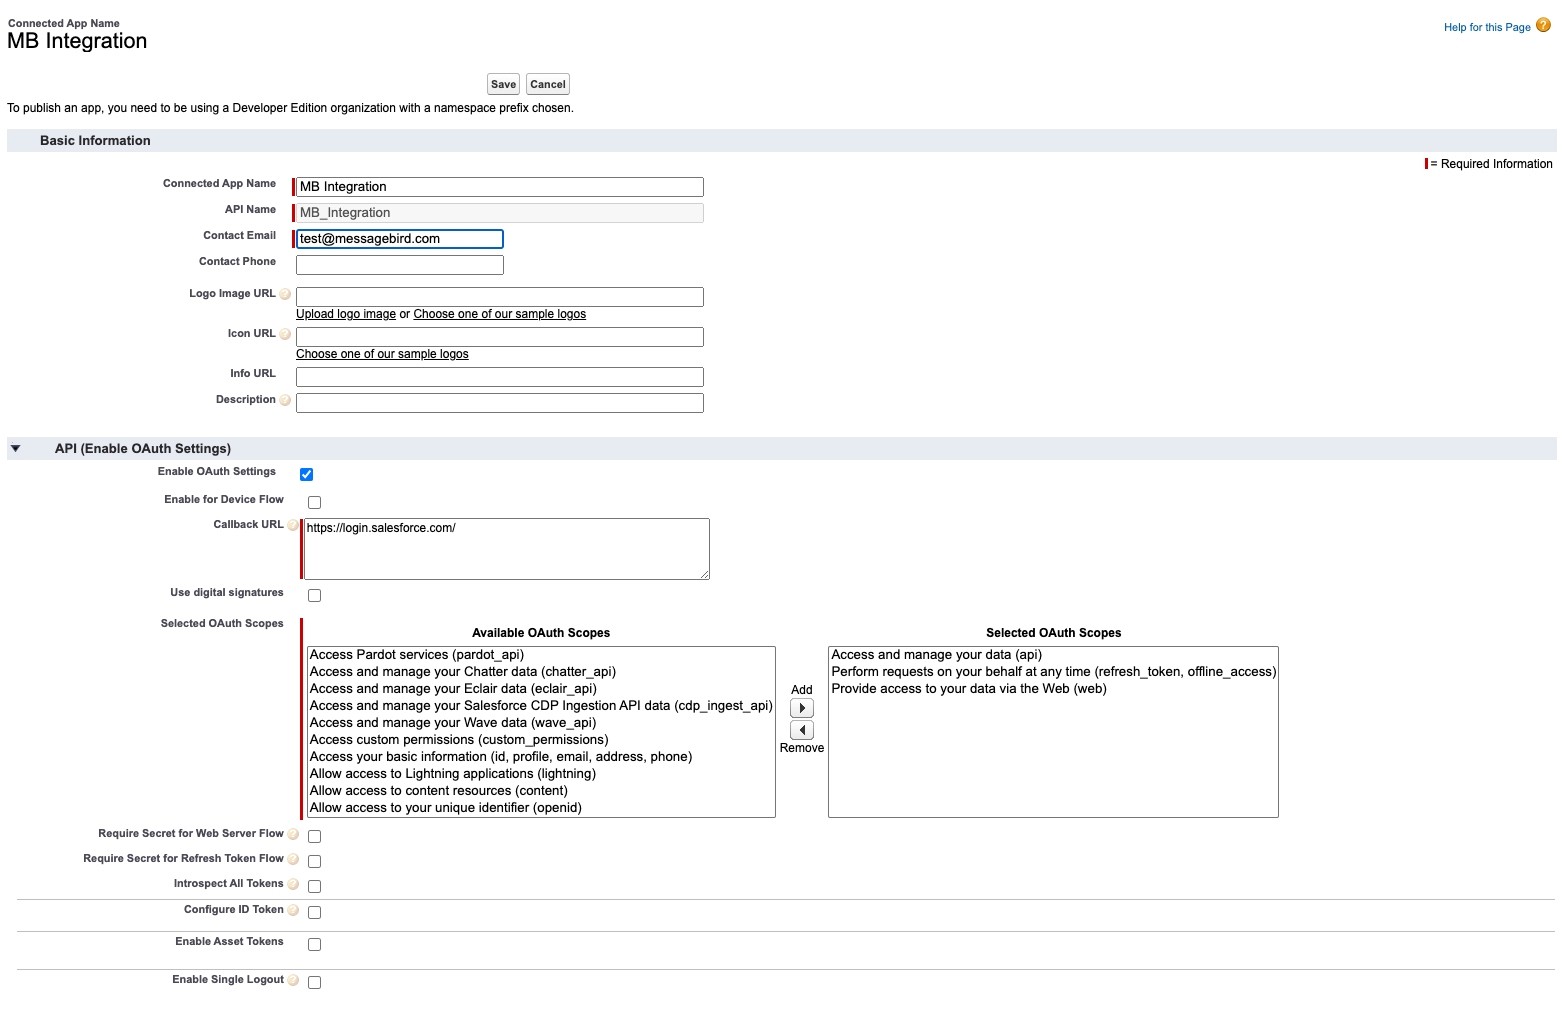
On the Nueva aplicación conectada page, fill the following required fields under Basic Information:
Nombre de la aplicación conectada, e.g. Bird Integration.
Nombre API, e.g. Bird_Integration
Correo electrónico de contacto, e.g. xxx@contactemail.com
Go to API (Activar la configuración de OAuth), and select Activar la configuración de OAuth.
In the URL de devolución de llamada field, enter https://login.salesforce.com/
In the Ámbitos de OAuth seleccionados field, select Acceda y gestione sus datos (api)
Proporcionar acceso a sus datos a través de la Web (web)
Realizar solicitudes en su nombre en cualquier momento (refresh_token, offline_access)
Click Añadir
Click the Guardar button to save the new Connected App.
In the Aplicaciones conectadas (Apps > App Gestioner) list, find the App that you just created, and then click Manage.
On the page that opens, click the Editarar button.
Under Políticas OAuth, select Todos los usuarios pueden autoautorizarse in the Usuarios permitidos list
In the Relajación IP, select Relajar las restricciones a la propiedad intelectual
In the Política de actualización de tokens, click El token de actualización es válido hasta su revocación. Under Session Policies, Select Tiempo de espera value (24 horas), click the Guardar button

Go back a la Connected Apps (Apps > App Manager) list, and click the App that you just created, and then click on Ver.
Go to API (Activar la configuración de OAuth) and note down the Clave del consumidor and Secreto del consumidor. You need this key and secret for the configuration of credentials in MessageBird’s Salesforce integration.
Paso 2: Obtención de tokens de Salesforce para autorizar el acceso
In Salesforce, access tokens have a limited lifetime specified by the session timeout. If an application uses an expired access token, a “Sesión caducada o no válida” error will be shown.
Utilice un token de actualización durante el proceso de autorización para obtener un nuevo token de acceso. El uso de un nuevo token garantizará que el token de acceso esté siempre activo.
Get your instance URL. Send the following curl request to obtain the instance URL.
client_id = Clave del consumidor
client_secret = Secreto del consumidor
nombre de usuario = nombre de usuario de inicio de sesión en Salesforce
contraseña = contraseña de inicio de sesión de Salesforce
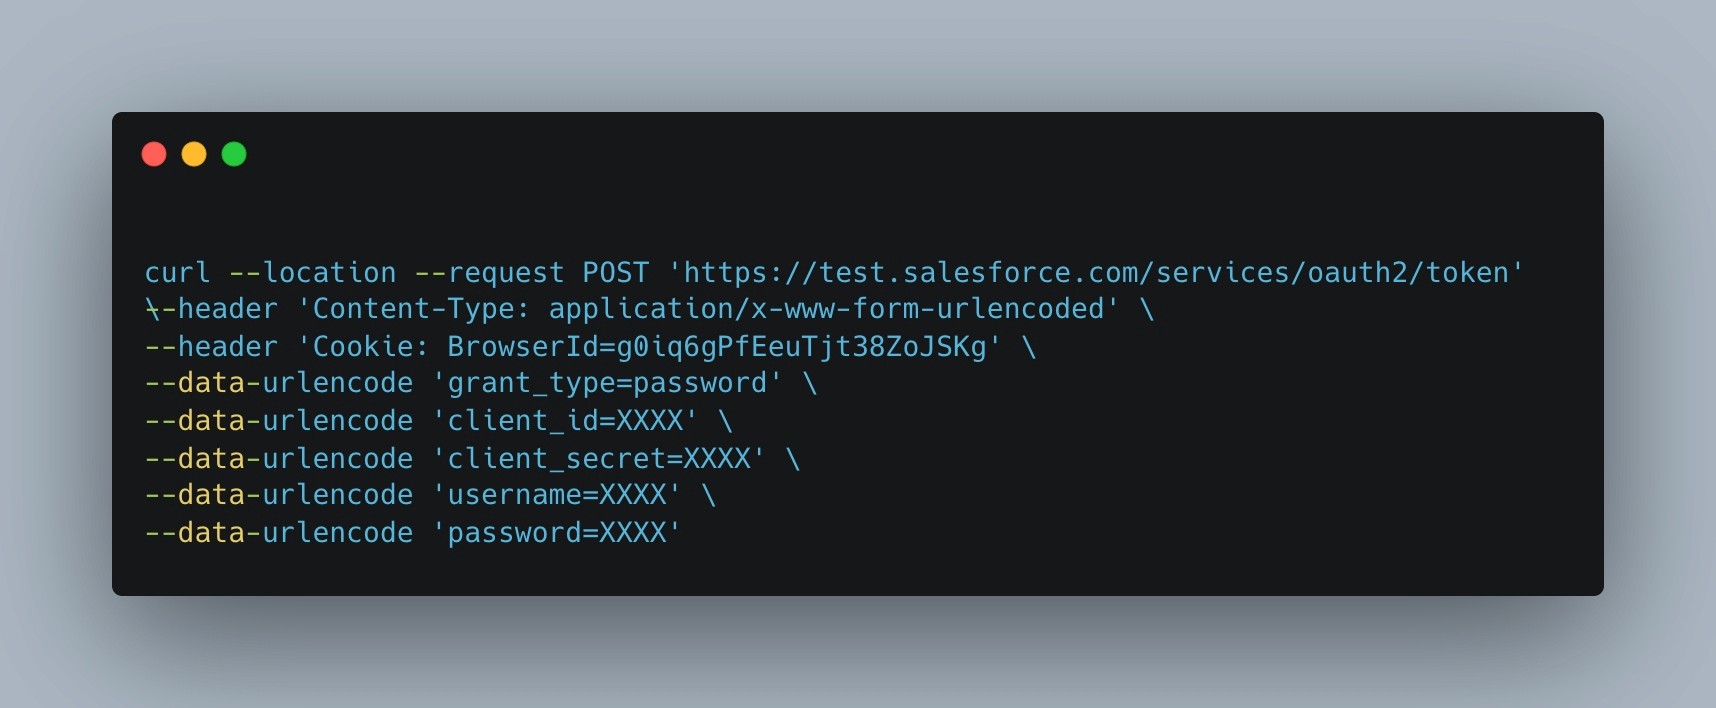
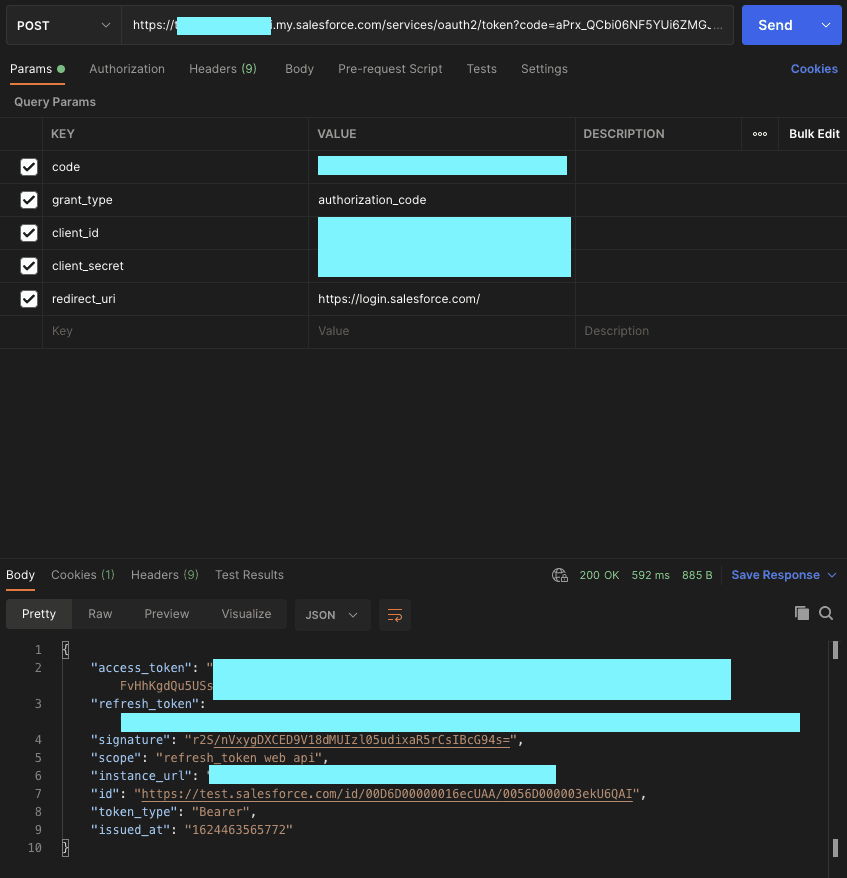
If you are not familiar with curl you can use Cartero to send the request. Follow these steps:
Get your code. Use your favorite browser, then enter the following request URL in a new tab to get the code.
<CONSUMER_KEY> should be replaced with the obtained Consumer Key in the above step
<YOUR_INSTANCE> should be replaced with your instance name
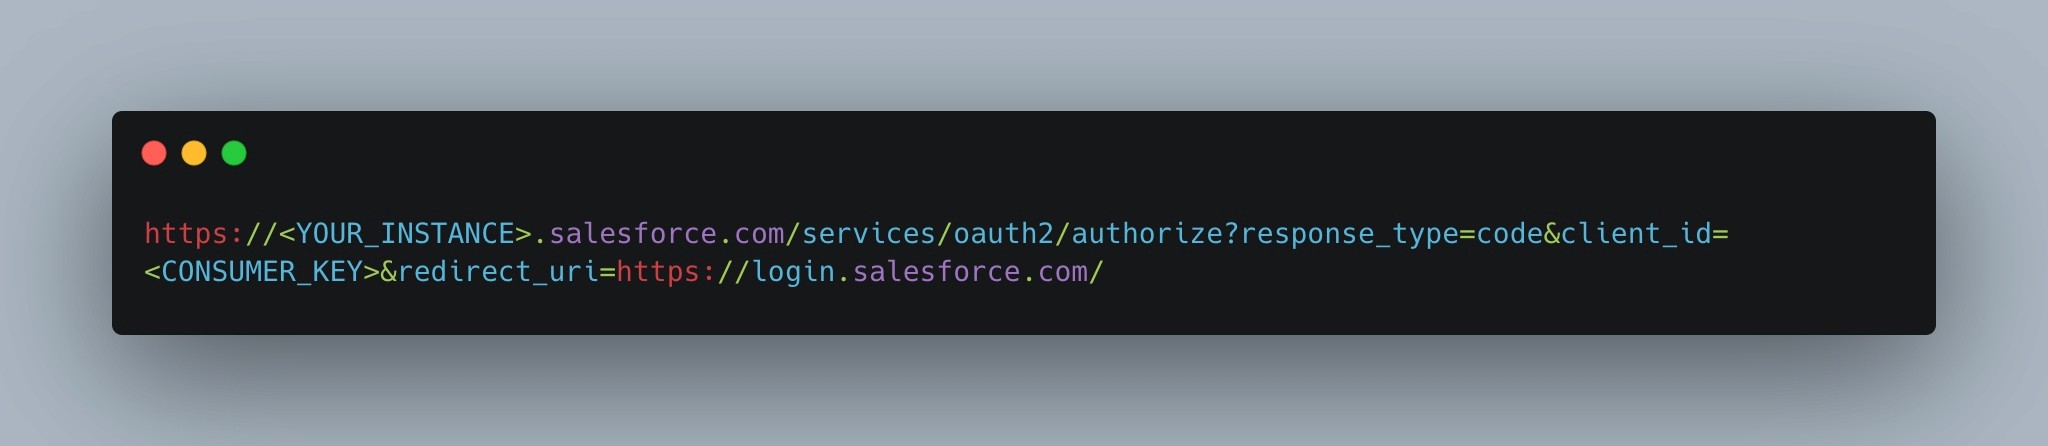

A continuación, introduzca la URL de su solicitud en el navegador. Permita el acceso si aparece alguna alerta. Verás que el navegador te redirige a una URL como la siguiente. Puede obtener el código utilizando esa misma URL.
https://login.salesforce.com/?code=XXXX
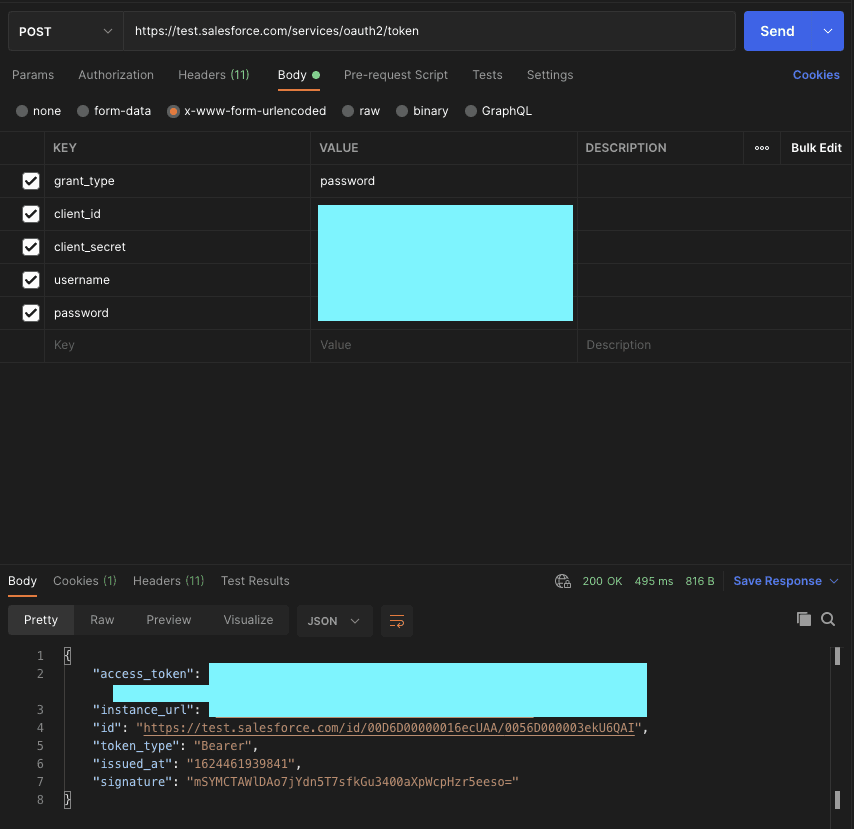
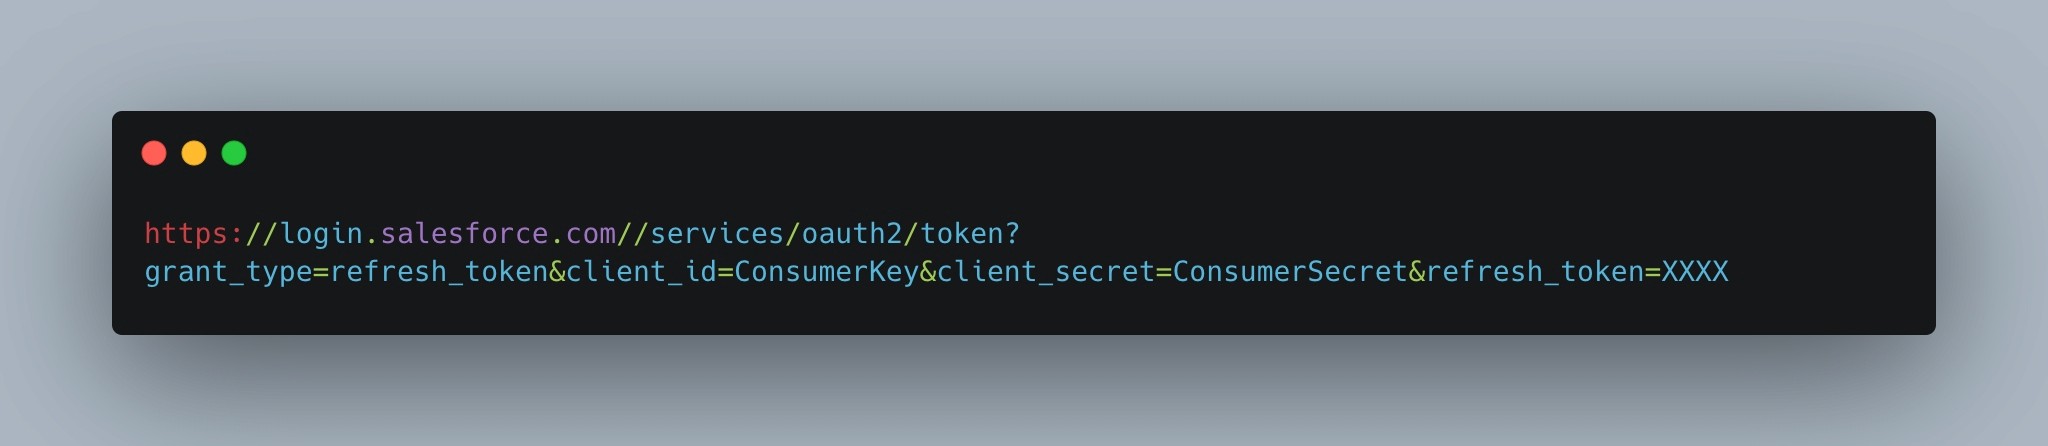
Get access token & refresh token: Send the following curl request to obtain the tokens.
<CODE> should be replaced with the code you obtained in the above step.
<CONSUMER_KEY>
<CONSUMER_SECRET> should be replaced with obtained keys with the created Connected App
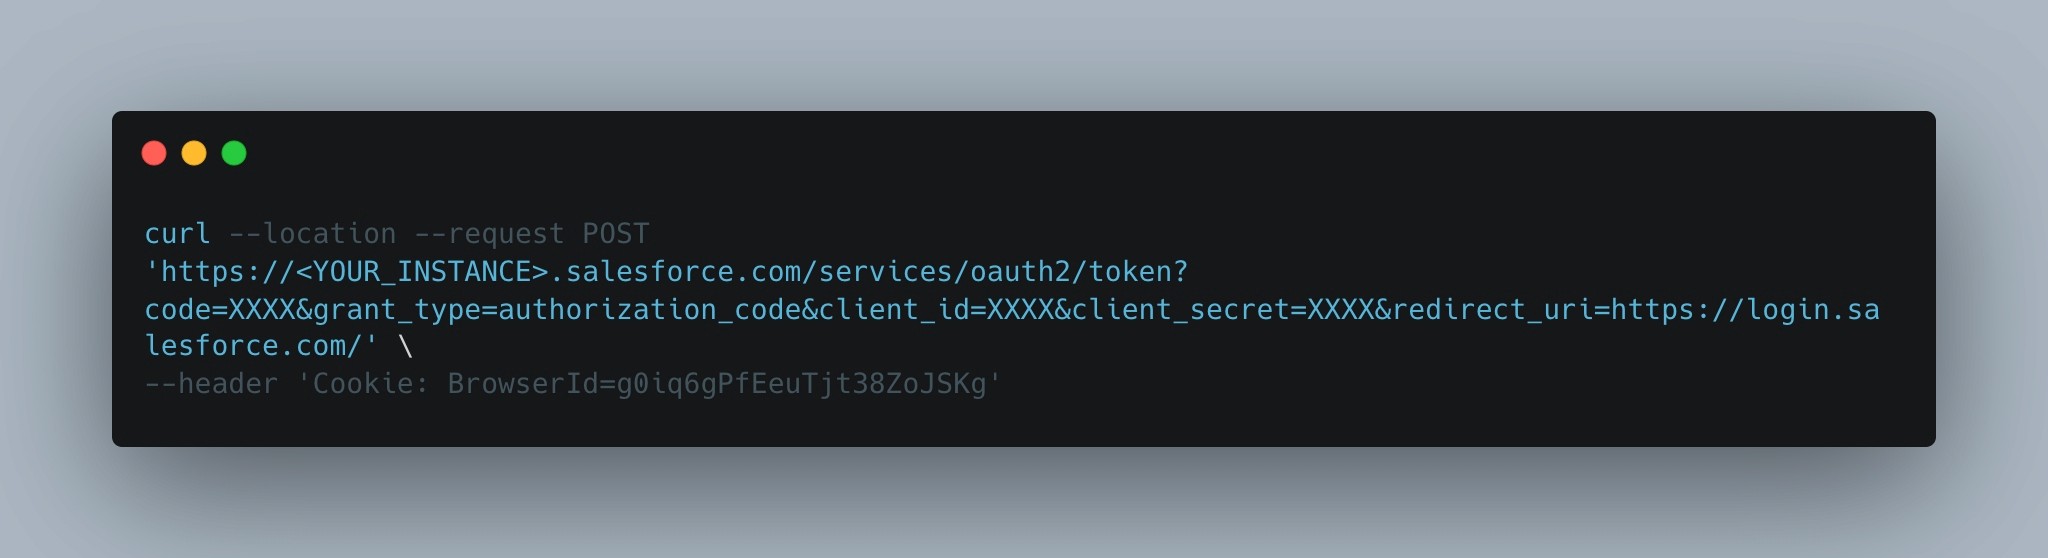
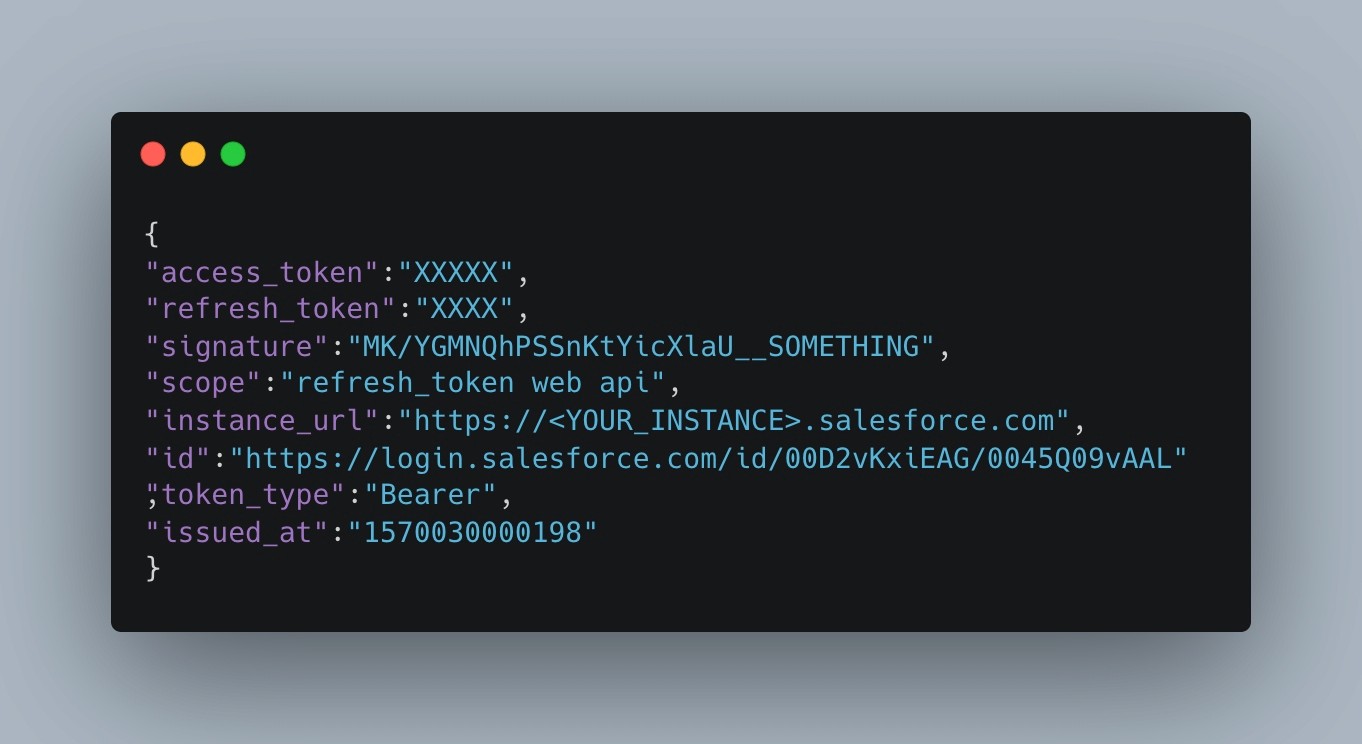
You can obtain the código_de_acceso and refresh_token from the response.
If you are not familiar with curl you can use Postman to send the request. Follow these steps:
Solución de problemas de conexión a Salesforce
El error más común al integrar Salesforce con Bird y cómo solucionarlo:
Problema: "La API REST no está habilitada para esta organización".
Cuando intente enviar una solicitud a la API de salesforce utilizando las credenciales anteriores, a veces obtendrá este error.
La API REST no está habilitada para esta Organización.
Puede resolver este error siguiendo los pasos que se indican a continuación.
Click on Configurar in the right top corner.
Go to ADMINISTRATION > Manage Users and click on Perfiles.

Click Edit on the specific profile you want to update.
Scroll down and go to Permisos administrativos and check the API activada checkbox.
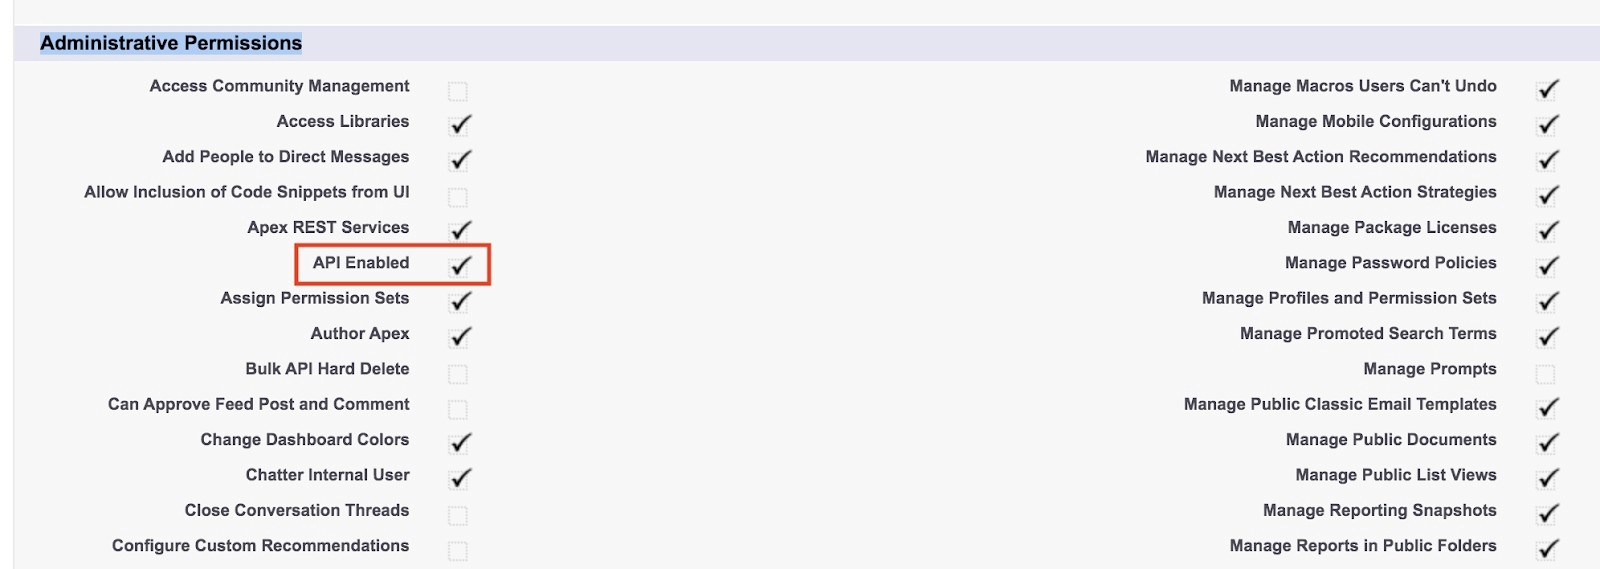
Don't forget to go down the page and click Guardar.
Paso 3: Crear un nuevo flujo en Flow Builder para crear clientes potenciales o casos
En configuration of Salesforce is done. Now, let’s start a new flow. Esta plantilla will help you connect your favorite communication channel with Salesforce and push new leads or cases for your team to follow up:
Log in to your Bird Cuadro de mandos and go to Flow Builder.
Download the flujo de muestras that you will be using.
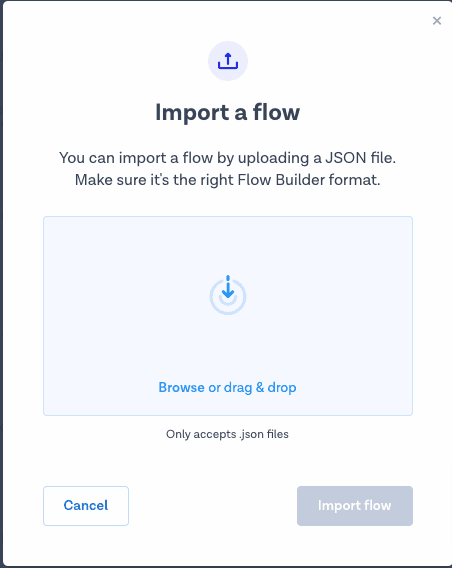
Import the flow with the import function.
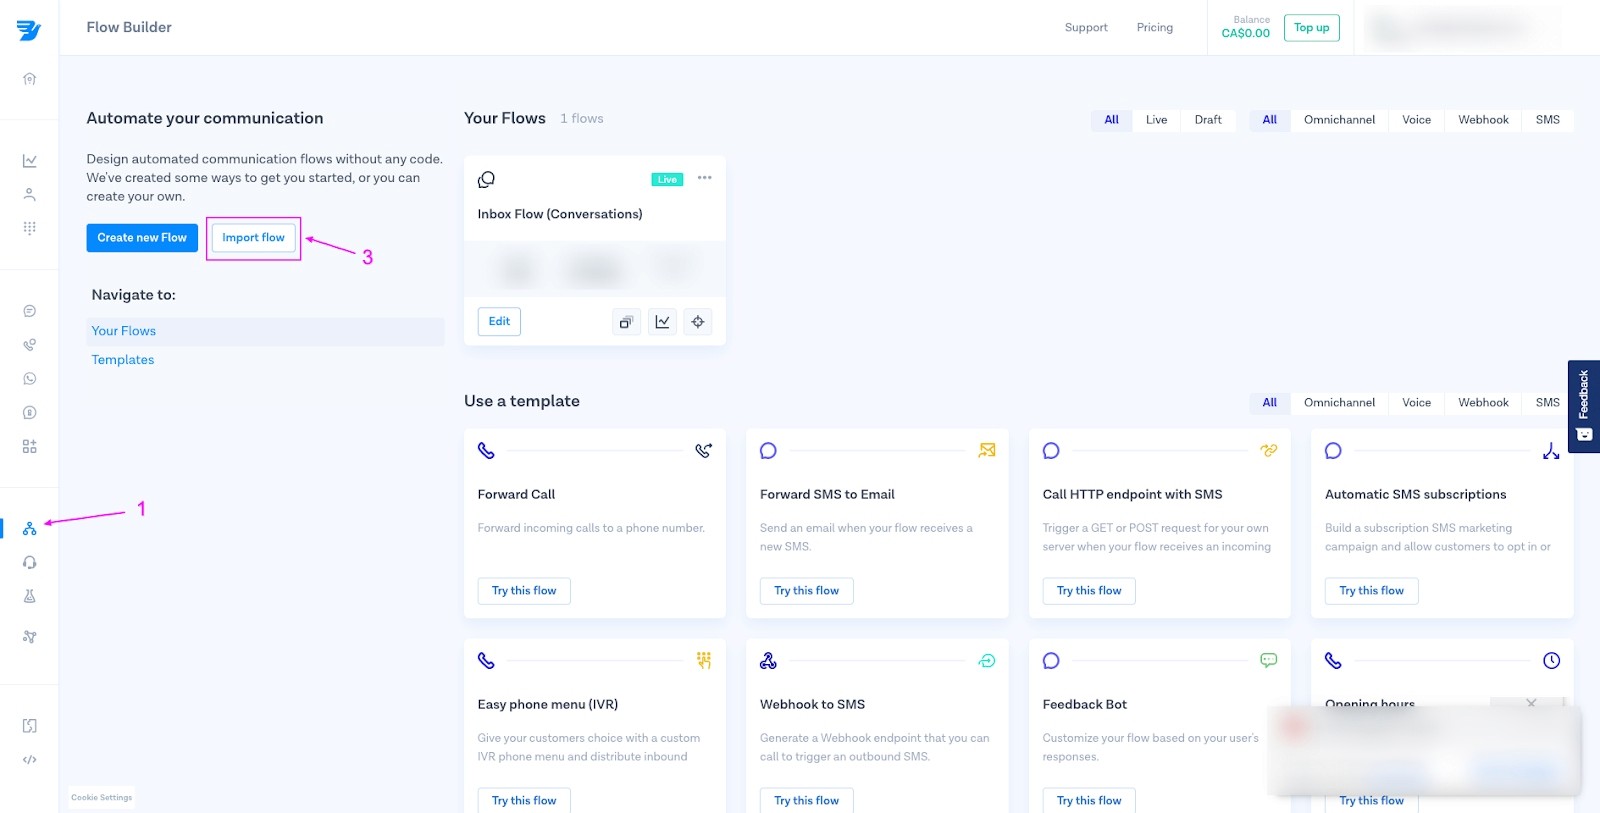
Attach the channels you want to use to create leads/cases into Salesforce. Then, you can publish this flow.
Uso de Salesforce con WhatsApp y Viber
Este flujo de plantilla le permitirá conectar su channels favorito (WhatsApp, Viber, SMS, etc.) con Salesforce. Los siguientes ejemplos, se mostrará cómo conectar Salesforce para crear clientes potenciales en:
WhatsApp
Viber
Tenga en cuenta que puede cambiar el canal o el caso de uso en función de sus necesidades.
Deberías poder ver tu flujo en la pantalla.
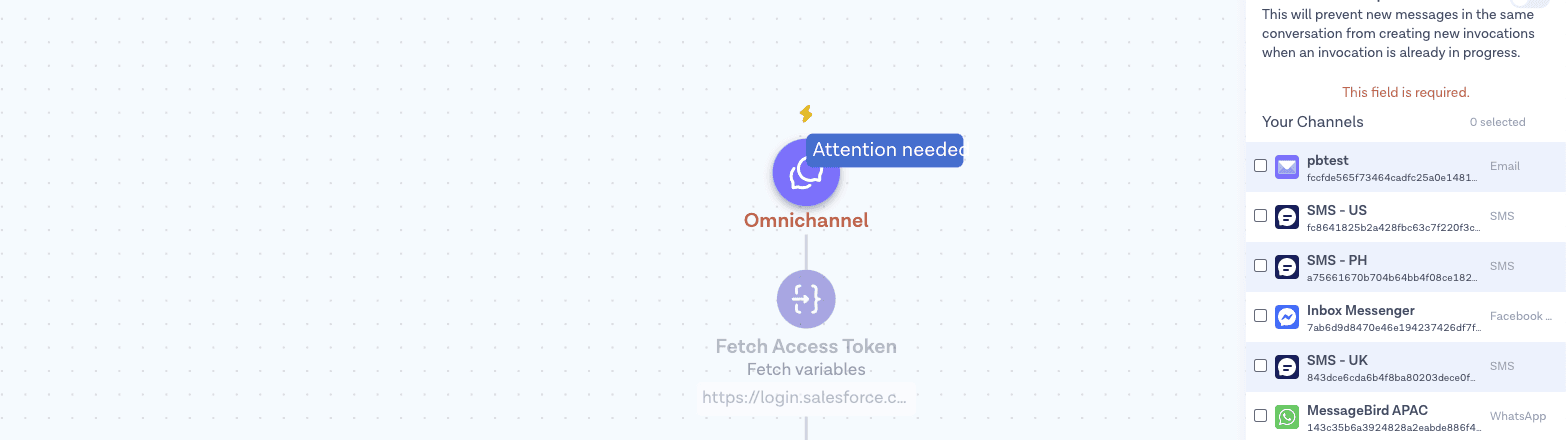
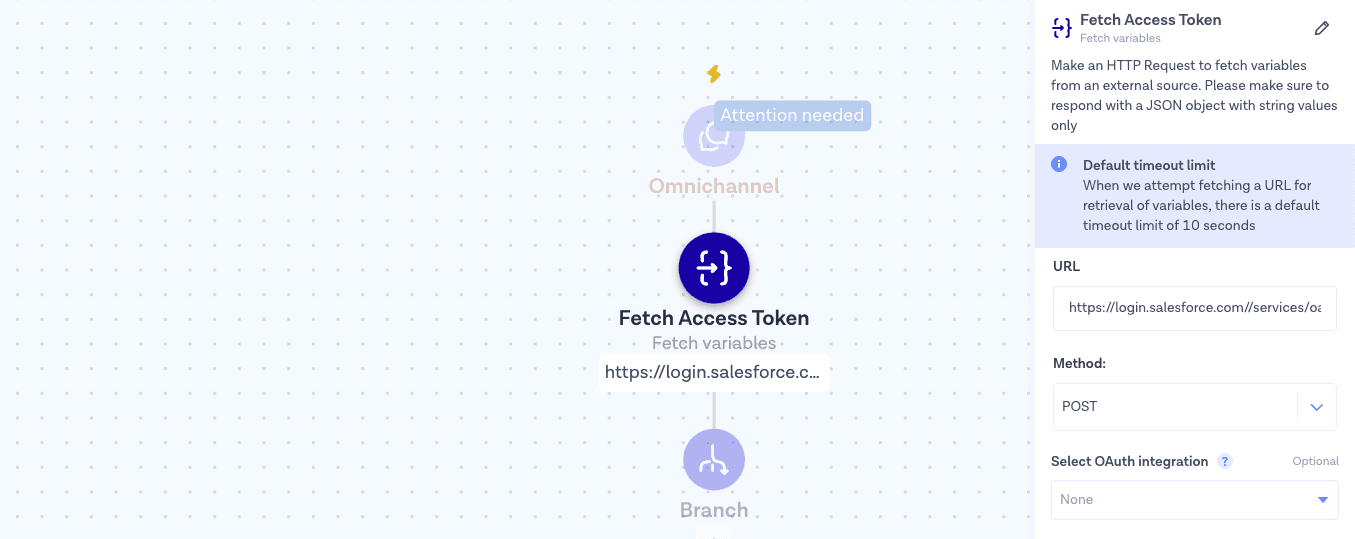
Fetch your access token before activating your flow.
El punto final de la API es el siguiente
client_id = Clave del consumidor
client_secret = Secreto del consumidor,
Para el refresh_token, consulte el paso 2.3.
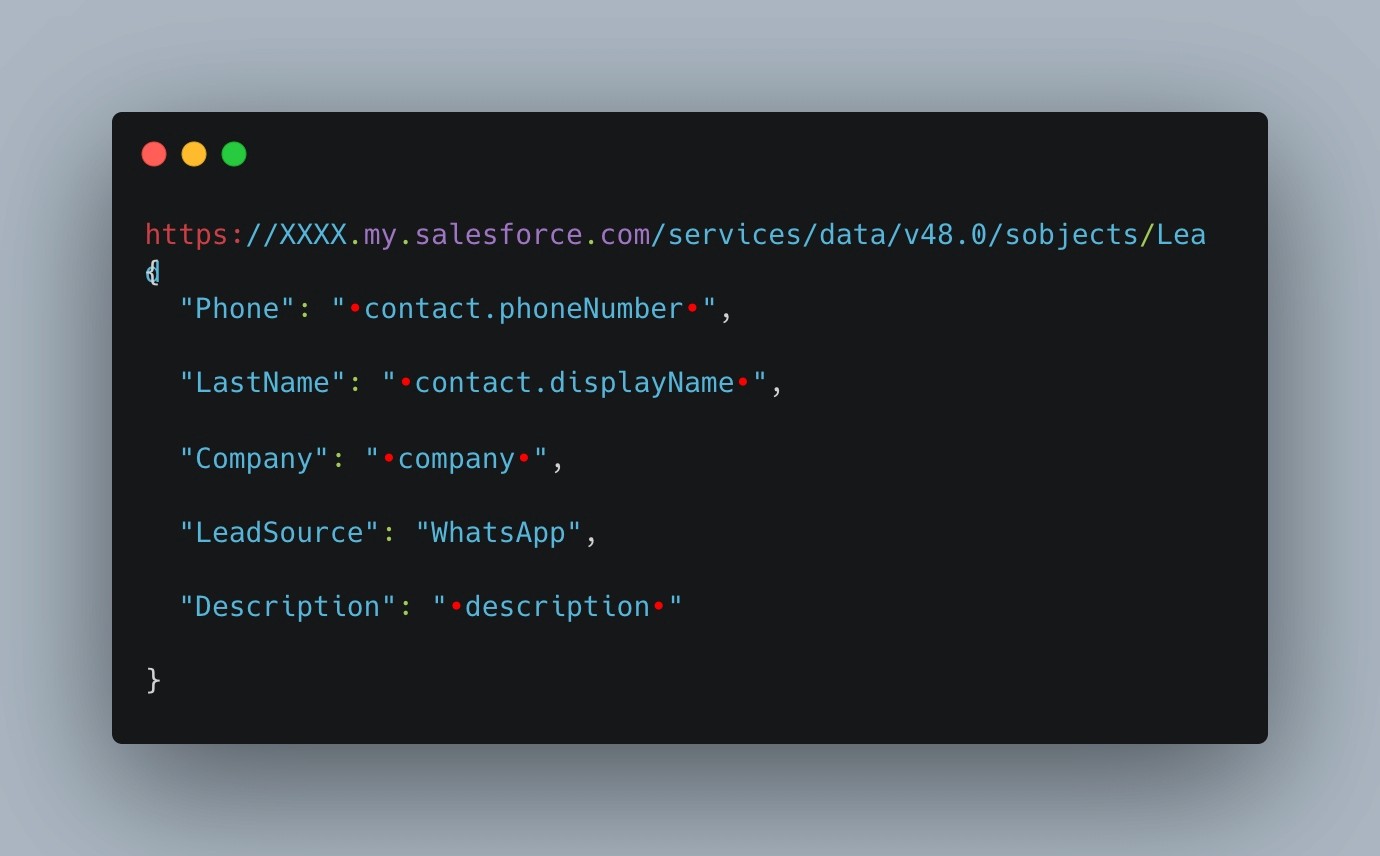
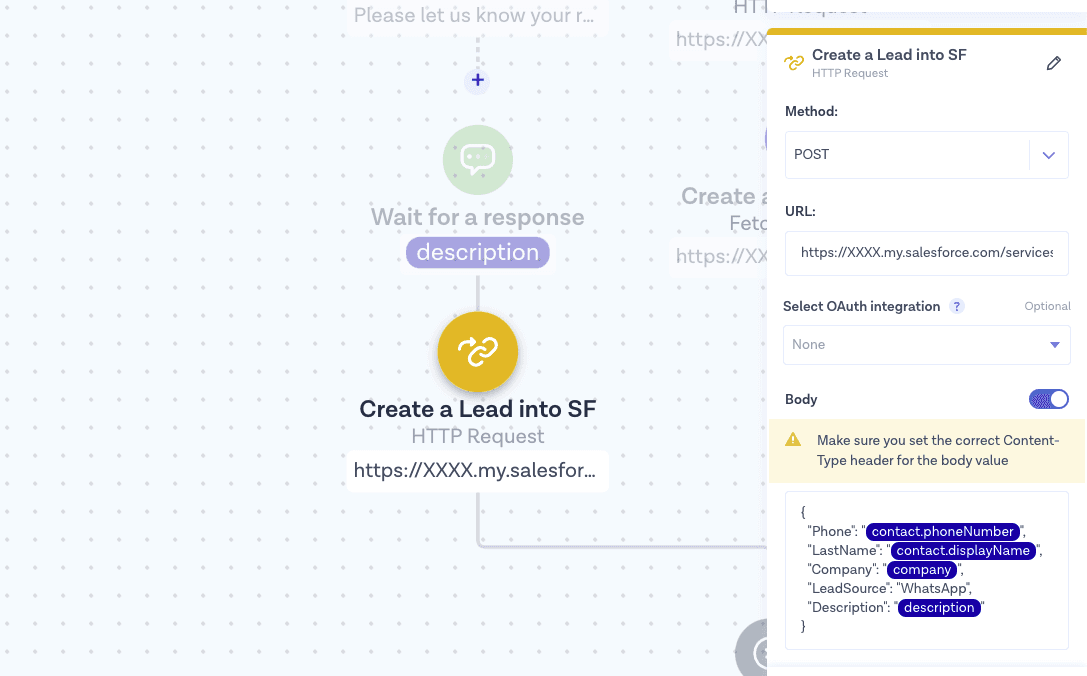
Crear un cliente potencial en Salesforce con WhatsApp
Replace https://XXXX.my.salesforce.com with your instance URL. Teléfono, Apellidos, Empresa, LeadSource, Descripción are the field names from Salesforce.
You can find them under Setup > Object manager > Lead > Fields & Relationship.
Crear un caso en Salesforce con Viber
Replace https://XXXX.my.salesforce.com with your instance URL. Teléfono, Apellidos, Empresa, LeadSource, Descripción are the field names from Salesforce. You can find them from Setup > Object manager > Lead > Fields & Relationship.
En output variable ID is the case ID returned from Salesforce.

Congratulations!
Acaba de conectar con éxito Salesforce con WhatsApp y/o Viber para crear clientes potenciales y casos para su equipo con el fin de permitir un compromiso más rápido e impulsar clientes potenciales más cualificados.
If you have any questions about your new flow or our Salesforce integration, please reach out to us here.