
Dec 31, 2018
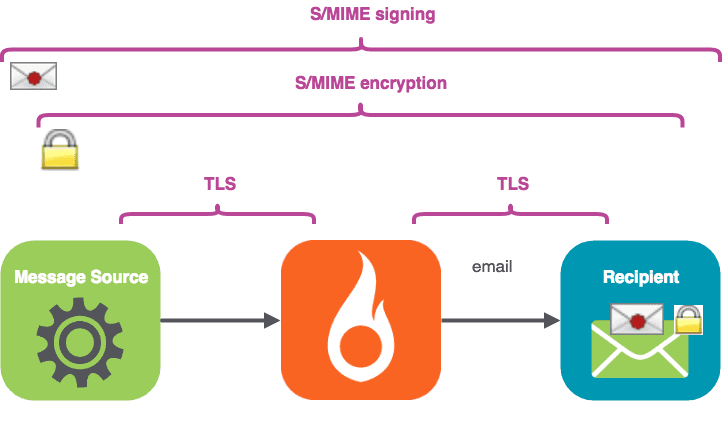
S/MIME Part 2: Signed, Sealed, and Delivered through SparkPost
En esta entrega:
Instale algunas herramientas sencillas de línea de comandos para firmar y cifrar el correo electrónico
Obtenga su clave de remitente / certificado para firmar
Enviar un mensaje firmado a través de SparkPost y ver el mensaje recibido
Opcionalmente, obtenga su certificado de destinatario para el cifrado
Enviar un mensaje firmado y cifrado a través de SparkPost, y ver el mensaje recibido
Pruebe una práctica herramienta independiente, "mimeshow", para ver el interior de los archivos de correo electrónico.
Bien, empecemos.
1. Instale las herramientas
En demonstration tools are in Github aquí, complete with installation instructions. You might notice the “build passing” logo – Travis and pytest automatically check the build status. Note these tools are not officially supported by SparkPost, but I’ve tried to make them robust and easy to use.
If you have some acquaintance with Python and pip, installation should feel pretty familiar. En Pipfile takes care of the external dependencies automatically for you. Once it’s done, you can check everything’s installed by running
./sparkpostSMIME.py -h
Deberías ver el amigable texto de ayuda. A continuación, tenemos que...
2. Obtenga su clave de remitente / certificado para firmar
Si ya dispone de un archivo de claves para su identidad de envío, puede saltárselo. De lo contrario, aquí tienes dos opciones para elegir:
a) Clave/certificado de prueba autofirmado (no válido externamente)
If you’re just testing, you can make “self signed” certificates and keys for an email address using the command line tool openssl on Linux, following a procedure such as éste. At the end of that process, you’ll have a smime.p12 file. Rename this file to match your sending identity, including the @ sign, for example, alice@example.com.p12 .
or
b) Claves / certificados con validez externa
If you want to get externally valid keys / certificates that enable you to sign, taquí’s a list of providers here. I found Comodo works well (free for non-commercial use), and it’s easier than the self-sign procedure above. Follow the sign-up process, receive your validation mail, and be sure to open the link in Firefox. Go to Firefox Preferences / Privacidad and Security. Scroll to Certificates / View Certificates:

Select your certificate, and use the “Backup” option to save as a file in PKCS12 format (add the file extension .p12 to your filename) which carries the private key and the public certificate chain.

Proporcione una contraseña para proteger el archivo .p12:

Generar archivos separados de claves públicas (.crt) y privadas (.pem)
Tanto si ha utilizado a) como b), ahora dispondrá de un archivo .p12 para su identidad de remitente. Es un gran paso adelante: ¡tómate un café ya!
Ahora tenemos que generar archivos separados de clave pública y privada como este - sustituyendo en su propia dirección de correo electrónico para el ejemplo. (Mac OSX y Linux):
openssl pkcs12 -in alice\@ejemplo.com.p12 -clcerts -nokeys -out alice\@ejemplo.com.crt openssl pkcs12 -in alice\@ejemplo.com.p12 -nocerts -nodes -out alice\@ejemplo.com.pem
You’ll need to enter the password you provided earlier. Note those backslashes \ are used to escapar the @ sign – not separating the names of a directory path (that’s a forward-slash / on Mac OSX and Linux).
If you’re using Windows, there are openssl implementations available such as the MINGW64 one built into the Herramientas Git de línea de comandos, but I found it tended to just lock up. You’ll probably find it easier and quicker to do this on Linux and then copy your files over. Those same Git tools for Windows come with a nice ssh client you can use to login to a Linux box, such as an Amazon EC2 instance.
2.1 Firmar un mensaje
Ya hay una clave/certificado ficticio y un archivo fuente de correo electrónico en el directorio de pruebas para alice@example.com, por lo que puede obtener algunos resultados incluso antes de tener sus propias claves. Sólo tienes que escribir lo siguiente:
cd pruebas ../sparkpostSMIME.py ejemplo_email1.eml --firma
Y lo conseguirás:
To: Bob <bob@example.com> From: Alice <alice@example.com> Subject: A message MIME-Version: 1.0 Content-Type: application/x-pkcs7-mime; smime-type=signed-data; name="smime.p7m" Content-Transfer-Encoding: base64 Content-Disposition: attachment; filename="smime.p7m" MIIKXAYJKoZIhvcNAQcCoIIKTTCCCkkCAQExDzANBglghkgBZQMEAgEFADCCAQoGCSqGSIb3DQEH AaCB/ASB+VRvOiBCb2IgPGJvYkBleGFtcGxlLmNvbT4NCkZyb206IEFsaWNlIDxhbGljZUBleGFt : :
You can’t actually send emails from example.com via SparkPost unless you own that domain, so the next step is to use your own key and send a signed message from your own domain.
3. Enviar un mensaje firmado a través de SparkPost
Now let’s use a real sending domain, set up as per the SparkPost Nueva Guía del usuario. We have the sender certificate and key files in the current directory:
steve@thetucks.com.crt steve@thetucks.com.pem
The file tests/declaration.eml is included in the project. It’s just a text file, so you can customize the From: address to suit your own sending domain and the To: address to suit your test recipient. The beginning of the file looks like this:
To: Bob <bob.lumreeker@gmail.com> From: Steve <steve@thetucks.com> Subject: Here is our declaration MIME-Version: 1.0 Content-Type: text/plain; charset=utf-8; format=flowed Content-Transfer-Encoding: 7bit Content-Language: en-GB When in the Course of human events it becomes necessary …
Establezca su clave API:
export SPARKPOST_API_KEY=<<Put your API key here>>
Envía el correo electrónico:
./sparkpostSMIME.py tests/declaration.eml --sign --send_api
Ya lo verás:
Opened connection to https://api.sparkpost.com/api/v1 Sending tests/declaration.eml From: Steve <steve@thetucks.com> To: Bob <bob.lumreeker@gmail.com> OK - in 1.15 seconds
Un segundo más tarde, el correo electrónico llega a la dirección de Bob inbox. Thunderbird lo muestra con un punto rojo en el sobre, lo que indica que la firma del remitente es válida.

¡Éxito! Termina ese café, te lo has ganado. Si tienes problemas, comprueba que la dirección De: del archivo de correo electrónico coincide con el nombre de tus archivos .crt y .pem.
4. Cifrado de mensajes
Para cifrar un mensaje, necesitas la clave pública de tu destinatario en forma de certificado. Se trata de un archivo de texto con el siguiente aspecto:
Bag Attributes friendlyName: s COMODO CA Limited ID #2 localKeyID: 32 84 AB 9C 56 5C 80 C6 89 4D 40 46 DD D4 7C 71 E8 CD ED C1 subject=/emailAddress=bob.lumreeker@gmail.com issuer=/C=GB/ST=Greater Manchester/L=Salford/O=COMODO CA Limited/CN=COMODO RSA Client Authentication and Secure Email CA -----BEGIN CERTIFICATE----- looks like random characters in here -----END CERTIFICATE-----
Hay un certificado de destinatario ficticio para bob@example.com en el directorio de pruebas, para que puedas practicar con él antes de tener un certificado real:
cd tests ../sparkpostSMIME.py ejemplo_email1.eml --sign --encrypt
Ya lo verás:
To: Bob <bob@example.com> From: Alice <alice@example.com> Subject: A message MIME-Version: 1.0 Content-Type: application/pkcs7-mime; smime-type=enveloped-data; name=smime.p7m Content-Transfer-Encoding: base64 Content-Disposition: attachment; filename=smime.p7m MIIRwQYJKoZIhvcNAQcDoIIRsjCCEa4CAQAxggKlMIICoQIBADCBijCBhDELMAkG :
You’ll notice the length of output is quite a bit longer than with an encriptado message because it carries a lot of información adicional as well as the scrambled message itself.
4.1 Envío de un mensaje cifrado y firmado a través de SparkPost
Let’s send an encrypted message to a real email address. You can follow the same process as before (self-signed or a provider such as Comodo) to get a public key / certificate for your own recipient addresses. You only need the .crt file – the recipient does not ever need to give you their private key (.p12 and .pem files).
I have the file bob.lumreeker@gmail.com.crt for my intended recipient – matching the From: address in my file.
Aquí está el comando a enviar:
./sparkpostSMIME.py tests/declaration.eml --sign --encrypt --send_api
Ya veo:
Opened connection to https://api.sparkpost.com/api/v1 Sending tests/declaration.eml From: Steve <steve@thetucks.com> To: Bob <bob.lumreeker@gmail.com> OK - in 1.168 seconds
El correo aparece en Thunderbird con el icono de firma "punto rojo" y el icono de cifrado "candado".

You can send complex HTML-based email with links and images just as easily, such as the one shown in Part 1. Some clients such as Thunderbird ask for permission to display external links and images within encrypted S/MIME messages, but sólo con firma messages display well in clients including Thunderbird and Gmail:


Observe que el desplegable muestra "Dirección de correo electrónico verificada".
Further thoughts & things to be aware of
Esta herramienta adopta un enfoque supersencillo para extraer las claves necesarias: sólo busca archivos con nombre en el directorio actual. Arreglos más complejos, como la celebración de todas las claves en una base de datos podría ser fácilmente añadido, pero yo quería que el código sea lo más simple posible.
Puedes incluir a otros destinatarios con CC: y CCO: y serán entregados; esto podría ser útil con fines de archivo. Los mensajes firmados se reciben y pueden ser visualizados por otros destinatarios junto con la firma. La herramienta elimina la cabecera CCO: del mensaje entregado (como haría un cliente de correo de escritorio).
Para garantizar que los mensajes pasen por SparkPost sin cambios (lo que podría romper la firma), la herramienta establece opciones de API para el envío "transaccional", con el seguimiento de aperturas y clics desactivado.
Si utilizas encriptación, ten en cuenta que la herramienta recoge la única dirección Para: para ello. Los demás destinatarios sólo podrán descodificar el cuerpo del mensaje si disponen de la clave privada del destinatario Para:. Si sólo utilizas destinatarios secundarios como registro de las entregas realizadas, por ejemplo, puede que no haya problema.
Firmado, sellado y entregado... soy tuyo.
That’s our quick overview of how to sign, seal and deliver S/MIME messages through SparkPost. Quick reminder: the demo project is in Github here, I’ve tried to make it easy to install and use.
Función adicional: visualización de partes MIME con "mimeshow".
Los archivos multiparte MIME RFC822 son bastante complejos de leer para los humanos. El proyecto incluye una herramienta independiente llamada mimeshow para facilitar esta tarea.
Esto toma cualquier archivo de correo electrónico que tenga (no sólo los S/MIME) y muestra la estructura interna. He aquí un ejemplo:
./mimeshow.py testcases/img_and_attachment.eml
Ya lo verás:
To Bob <bob.lumreeker@gmail.com> From Steve <steve@thetucks.com> Subject Testing attachments etc MIME-Version 1.0 Content-Type multipart/mixed; boundary="------------7D48652042860D0098C65210" Content-Language en-GB Content-Type multipart/alternative; boundary="------------58C0BF87598336550D70EB95" Content-Type text/plain; charset=utf-8; format=flowed Content-Transfer-Encoding 7bit Content-Transfer-Encoding quoted-printable Content-Type text/html; charset="utf-8" Content-Type application/pdf; name="sparkpost-datasheet-tam-technical-account-management.pdf" Content-Transfer-Encoding base64 Content-Disposition attachment; filename="sparkpost-datasheet-tam-technical-account-management.pdf"
You can also use as a filter to give a human-readable summary of sparkpostSMIME output:
./sparkpostSMIME.py tests/declaration.eml --sign --encrypt | ./mimeshow.py
Ya lo verás:
To Bob <bob.lumreeker@gmail.com> From Steve <steve@thetucks.com> Subject Here is our declaration Content-Language en-GB MIME-Version 1.0 Content-Type application/pkcs7-mime; smime-type=enveloped-data; name=smime.p7m Content-Transfer-Encoding base64 Content-Disposition attachment; filename=smime.p7m
Finalmente...
To recap – we’ve installed some simple command-line tools for signing and encrypting email (the Github repo is here, complete with installation instructions).
Obtuvimos nuestra clave / certificado de remitente para la firma, y enviamos un mensaje firmado a través de SparkPost. Obtuvimos un certificado de destinatario para cifrarlo y, a continuación, enviamos un mensaje firmado y cifrado a través de SparkPost.
Por último, probamos la práctica herramienta independiente "mimeshow" para ver el funcionamiento interno de los archivos de correo electrónico.
¡Eso es todo por ahora! ¡Hasta pronto!